.JPG)
Replacement of the deck sides, next to the Deck House.
The only parts left before the new teak deck can be
installed are the sides of the deck next to the deck-house. The sides of the
actual deck are original installed before the deck-house was fitted.
It is at this moment not my intention to remove the complete deck-house since most of the wood of the deckhouse is in a good condition. The complete teak with the sub-deck had to be removed for installing a new teak deck. First step was to remove all the plugs and screws which hold down the teak deck on the transversal beams this to create as less as possible damage to these beams which most are in a good condition in my case. The next step was to cut with a Multi Tool through the deck where it joins the deck-house.
It is at this moment not my intention to remove the complete deck-house since most of the wood of the deckhouse is in a good condition. The complete teak with the sub-deck had to be removed for installing a new teak deck. First step was to remove all the plugs and screws which hold down the teak deck on the transversal beams this to create as less as possible damage to these beams which most are in a good condition in my case. The next step was to cut with a Multi Tool through the deck where it joins the deck-house.

The deck was then
carefully removed from the transversal and longitudinal deck beams, the Teak
planks were hold in place with copper nails through the sub-deck into the
beams. After the deck was remove wood of the deck is still under the deck-house
which needs to be removed as well. With a small chisel and hammer this wood was
carefully removed, it showed during this process that the sub deck would not
move as well as that at certain points the teak plank would not give away.

Further inspection showed that at the point where the deck
house was placed on the teak deck that the teak planks were screwed in the
longitudinal deck beams as well as that the sub-deck was nailed into the deck
beams.


As one can understand
it is at this point impossible to remove the screws and nails therefore the
Multi tool was used again with a special saw blade for metal, the crews and
nails were cut between the beams and the sub-deck leaving behind a smooth
surface. The “groove “ where the sub-deck and the teak were fitted between the
beam and the deck-house were than cleaned properly from all rest pieces of wood
and the original kit used for water tightness.


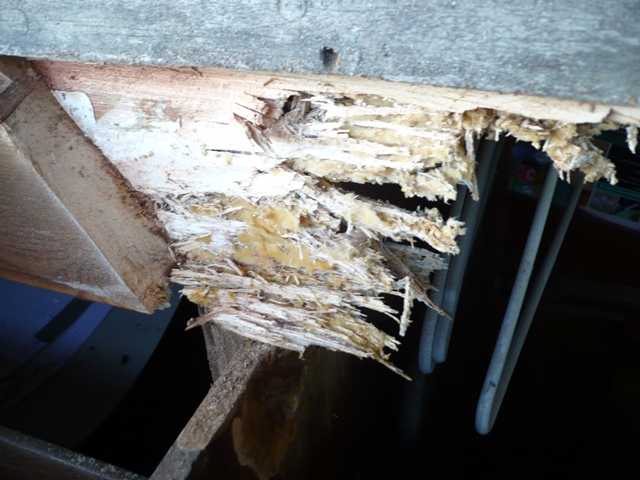
After the deck was removed some more rotten wood was found
mainly at the point where the air intakes are positioned for the engine-room.
As can be seen from the pictures beams were rotten away as well as a part from
the wall between the cabin and steerage space, replacement of parts of this
wall will be described in a later stage.

New beams were installed in place of the air intakes and the
same time to prevent rot in the future this complete area was cleaned and
protected with 2 component thin epoxy, except of the hull of course which is
regular coated with linseed oil. Marine plywood, 6 mm like original was both
side coated with this 2 component epoxy to protect it against the weather. Before installing the sub deck at the position
of where it will be glued with 2 component epoxy onto the beams the sub-deck is
sanded to get a good bond.


The new pieces of the sub deck are than glued onto the beams
and screwed down onto the beams, to make sure that a good bond would be created
as well as to prevent that holes would exist between the beams and the sub-deck
the amount of epoxy glue used was more than actually needed. This resulted of course
that on all sided epoxy would come out between the parts which were glued
together. This excessive amount of epoxy was removed before hardened and reused
to close the holes from the screw of earlier installed pieces of the sub-deck.

After 24 hours the glue had cured and the screws were
removed, screw holes filled with a thin epoxy to make sure that not holes would
remain in the sub-deck which could result in the future water ingress. When the
complete deck was installed it was sanded with a course sand paper grid 80 to
remove the high spots where wood was glued against each other as well as the
rest of the sub-deck. Than a new layer of thin 2 component epoxy was rolled over
the complete deck since during the sanding on several placed the original epoxy
was removed due to the sanding.

The next step will be installing of the teak deck which will
be another addition to this blog.