Wednesday, December 7, 2016

Propeller shaft hull penetration

                                                       Propeller Shaft  

Although a long time ago removed it was time to install again the propeller shafts and fix it to the engine coupling.
At the position where the propeller shaft enters the boat gave me the impression that there were issues with this part due to extra screws added into the wood. Also no gasket could be found between the shaft support and the hull.


The old bolt and nuts were removed and it was clear to me that there must have been water ingress into the boat, they were completely corroded.
These were still the original bronze bolts and nuts.


Everything was removed and the area completely cleaned from any debris, condition of the wood was checked.


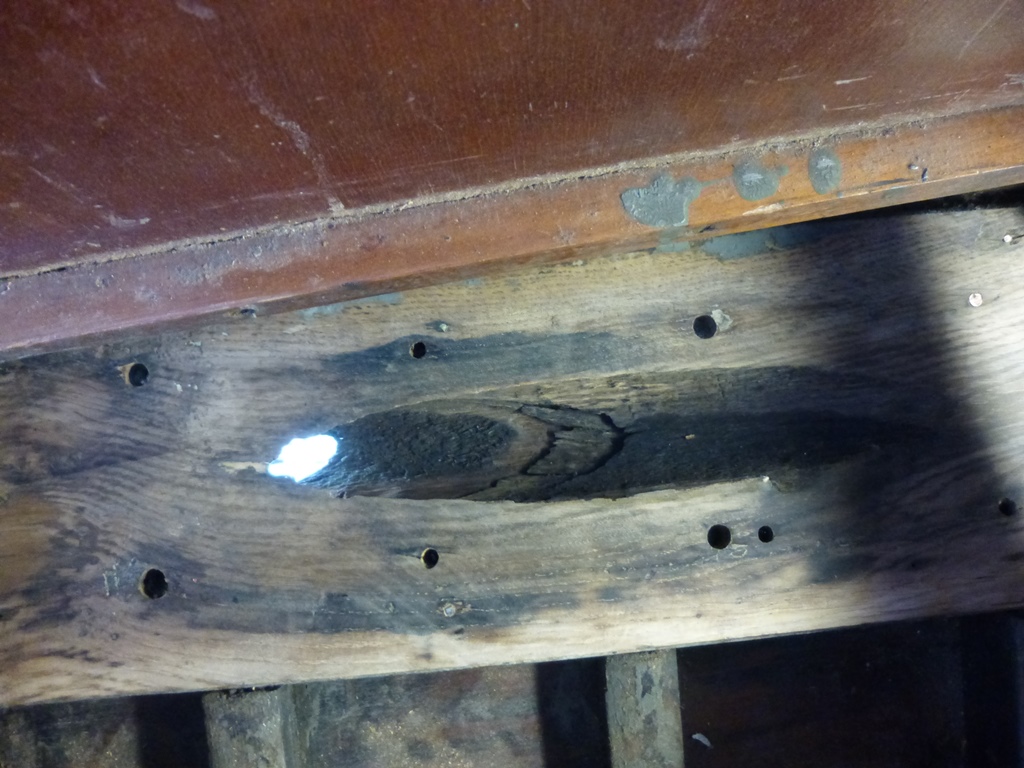
As one can see from the next picture there is wasted wood and the condition could be better. Since the boat is this long ashore and has dried out completely, gaps between the planks, I decided not to change the wood in this area, due to the fact that I might end up with an issue when the boat is put in the water. For example if the new wood is wider than the removed wood the gap between the planks might not close.
The plan is now that after one or two years in the water the wood in this area of both propeller shaft penetrations will be replaced.


The penetration through the hull was protected with several layers of anti-fouling paint from inside out as well as from the outside.
The holes not needed anymore for fixing the hull penetration were closed with plugs.


The actual bronze propeller shaft hull penetrations were fully cleaned and sanded to remove any dirt or high spots.


Thin rubber sheeting was placed over the bronze piece and with a round hammer the contour of the bronze was taken over onto the rubber. One has to make sure that the rubber does not move during this process also the holes although not seen on the pictures are marked as well.


Next step was to prepare the new bolts and nuts.
It was decided to use stainless steel bolts and nuts and make them flush with the hull.
Actually threaded rods were made on the correct seize and the nuts were on one side fixed with thread lock, to prevent them from moving.


A small recess round was made in the hull at the positions where the nut would be positioned.
The threaded with nut rod was fitted with washer and small O-ring, to prevent as much as possible water ingress in the hole for the threaded part.


Before installing the fixing bolt it was protected with Sikaflex also to fill the hole where the bolt passes through with protective material.


The bolt was inserted by rotating the bolt by the nut to make sure that all the wood inside would be covered with Sikaflex.
It was made sure that all extra Sikaflex was removed from around the nut and the hole where the nut would fit in.


When the nut was pushed the last few mm at the same time two component epoxy filler was added around the nut and over the nut making it almost flush with the hull.
The nut and thread are now completely sealed from the water, while at the same time the nut is fixed in place giving me the opportunity when the boat is in the water and the wood expands to tighten the nuts on the inside when required.
Nuts are now only slightly tightened.


On the inside two extra holes were drilled in the bronze hull shaft penetration on the aft side to make sure that the whole unit would be flat on the surface and still be tight in place.
This way I do not require to tighten the bolts and nuts to much until the wood is expanded when the boat is placed in the water.


On the inside the stuffing box did get new packing as well as that when the shaft was connected to the engine that the rubbers of the couplings were replaced.
As described with the rudder stock the packing was cut with an angle to get a good connection between the ends so preventing that water would go through and one needs to tighten the stuffing box too much.


Monday, November 14, 2016

Installation of Deck Hardware


                                       Installation of Deck hardware

In my case the first part was to go through old pictures with measurements to where to install the     re-chromed hard ware.
Pictures are from different installed pieces of hardware.


The measurements were placed on the deck and it was rechecked if the items were in the correct position from center line and forward or aft.
Next it was checked if the holes for the mounting would end up in the supports installed under decks.
Although this is somewhat time consuming it was good that I did do this otherwise one of the holes would have ended up very close to the edge of the wooden support under decks.

The holes in the deck were drilled first small pilot drill to recheck the correct position, followed by the largest drill for housing/fitting the bottom part of the deck bolder, than the last drill slightly larger than the thread size of the mounting threaded rod.
The  deck bolder was fitted to check for a flush mounting, I needed to take some small pieces of wood away to get a flush mounting, the deck, the bolder is made from cast bronze and those are not 100% smooth at the bottom side.
The holes were cleaned and protected with epoxy to prevent water ingress in the future.


The bolder was than placed in position and carefully tape was placed onto the deck around the foot of the bolder.


Tape was also placed onto the bolder itself to prevent that caulking would get all over chrome parts.
Seal and Glue caulking was added to the bottom of the bolder as well as into the holes in the deck, I used far more caulking than would be required but I rather waste some caulking than having the chance that a tiny hole in the caulking will create future issues, like water ingress.
The nuts were tightened to fix the bolder into place and as can be seen from the pictures a lot of caulking is pressed out between the deck bolder and the deck.


The excessive amount of caulking was removed directly; do not let the caulking become dry out.


Then the tape was removed pulling it away from the deck bolder, this way preventing that caulking would end up onto the chrome or onto the deck.


As can be seen from the next picture one has then a clean deck with minimum caulking between the chrome parts and the deck.


Following picture is from the installed bolder seen from the aft side.


Bow before with Painted chrome parts.


Bow after installation of re-chromed parts.


Thursday, November 10, 2016

Walls in forward and aft cabin replacement

                             Wall covering replacement forward and aft cabin.

Few years ago when the inside of the boat was taken apart the wall covering panels were removed and taken home and stored in a dry area.
It was known that some parts of the plywood were rotten away but the impression was that the actual wall covering could be used again after properly cleaning.
I have tried several chemicals to clean the vinyl and was partly successful but the biggest issue was that the foam behind the vinyl had been wet and that mold has been growing in the foam.
Even after several years of drying the foam did still smell as well as that on several places the foam was gone or falling apart


Further there were at several places damages to the foam on points which are visible.


Most of the panels in the bow did had water damage and the wood was deteriorated and falling apart.


It was then decided to replace all panels with new wood and new vinyl. To buy the wood is reasonable easy but to get the same type of vinyl was impossible in Holland did find this type of vinyl in the USA but with shipping cost and the amount of vinyl needed it would become to expensive for me. I found an acceptable alternative which is very close to the installed one but without the stitching of the lines, so called rail road tracks.

The first step was to remove all the vinyl from the plywood panels to be able to fabricate the new required plywood panels.
This was not too difficult but a lot of staples needed to be removed and the good thing was that the vinyl foam layer was not glued onto the wood.


New marine plywood was bought same thickness otherwise in the aft cabin it would not fit into the slots of the wood.
The plywood was painted both sides to protect the wood for future moisture .
The old panels were drawn onto the new panels and the panels were cut out, the rims of the wood were painted as well.


The next step was to fit the new panels in the boat to see if there were any mistakes made during copying from the old removed panels, bearing in mind the thickness of the to be installed vinyl onto the panels.

It was decided with the supplier of the vinyl to glue the vinyl onto the wooden panels.
Cutting the vinyl is not that simple a good pair of scissors will do the trick but placing the vinyl onto the wood especially where two panels meet each other is more challenging especially in the bow where, the panels are not square shaped.

The panel was positioned onto the vinyl keeping in mind the required overhang to be able to fold the vinyl around the wood and having enough material left to fix it onto the wood.


To make sure that the vinyl lines would follow the required pattern and no changes would be made to the position during the gluing of the vinyl onto the wood the first part of the vinyl around 10 cm was glued onto the wood.
When this was dry, next day the rest of the vinyl was glued onto the wood.
.


Another day of waiting before the material could be folded around the wood and be fixed in position
To be able to glue the material which needed to be folded the area which needed to be glued was left open while the area where no glue should be was protected, I uses spray glue specific for this material.


When one folds the vinyl at the corners a thick part of vinyl will be the result which will be thicker than the rest of the fold over vinyl this will result that the corners will be thicker than the rest of the panels and when mounting them this will be visible.

Therefore at the corners the foam layer of the vinyl was removed.


When both sides were glued in position the corner needed to be glued in position.
We placed very thin double sided tape on the wood and positioned the material in the right position, then one side was folded into the correct position and fixed with staples. The next step was to fix the other side in position and fix with staples as well.


Although a difference can be seen between old and new panels I do think is is a major improvement.


Original the panels were fixed with a brass nail onto the boat I decided to fix them with a screw this way it will always be possible to have them relatively easy removed without damaging them.


The aft cabin is where the aft two panels are placed into a groove between two pieces of wood therefore it is important to keep the panels at the corners as thin as possible.


The following pictures are from the finished installation
Forward cabin before


Forward cabin after installing the new panels in position.


Forward cabin finished overview pictures


Aft cabin before new panels are installed.

.


Aft cabin after the new panels have been installed.